Showing posts with label recipe. Show all posts

Monday, 9 October 2017

Breakfast Recipe That'll Brighten More Than Just Your Morning!


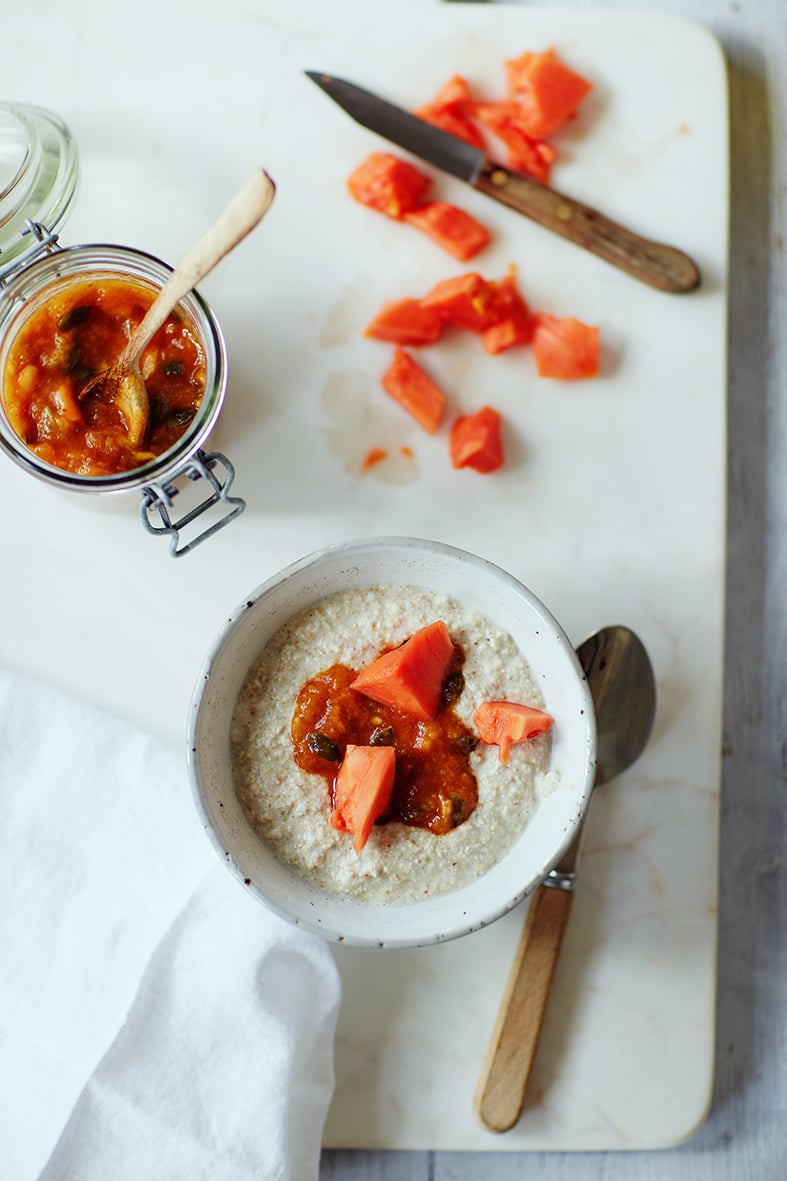
At this point, you've probably tried every delicious porridge recipe there is for breakfast. But there's a new kid on the block, and your breakfast menu simply isn't complete without it. This porridge recipe boasts immune-boosting powers of buckwheat and papaya, to give your mornings a wake-up call that's not only delicious but also healthy.


Buckwheat Porridge with 

Papaya Topping

INGREDIENTS

    Antioxidant Buckwheat Porridge Recipe
  1. For the porridge:
  • 170 grams buckwheat groats
  • 480ml water
  • 120ml almond milk
  • 1 teaspoon vanilla extract
  • 1 tablespoon lime juice
  1. For the papaya topping:
  • 1 large papaya
  • zest of 1 lime
  • 1/2 teaspoon ground cinnamon
  • 1/4 teaspoon ground ginger
  • 1/4 teaspoon ground nutmeg
  • 2 tablespoons raw honey
  • 2 tablespoons pumpkin seeds

DIRECTIONS

Porridge:
  1. Soak the buckwheat groats in the 480ml water for at least 1 hour or overnight. After soaking, strain, and rinse well.
  2. Put the soaked groats in a pot, add your almond milk and cook until soft. When cooked to your liking, add vanilla extract and lime juice and stir well.
Topping:
  1. Peel the papaya, then cut it into chunks and place in a large jar or container, add the remaining ingredients, and mash together (be sure to leave a few chunks in there) with a large spoon to release the juices and blend the flavours.
  2. Cover your jar or container with an airtight lid and place in the fridge to marinate overnight.
  3. Plate the groats in two bowls, top with your papaya relish and enjoy.


Click Here For More Articles

Don't forget to opt-in to Our Healthy Living Society and get 3 free gifts while receiving the latest information on health, well-being and groundbreaking news about natural nutrition.

Monday, 25 May 2015

Broccoli Basil Cream Soup

Broccoli Basil Cream Soup

By Shelley Alexander

Broccoli Basil Cream Soup is a creamy soup that uses walnuts in place of cream to create a delectable soup designed to cleanse, nourish, and rebuild your body. This easy recipe comes together quickly and combines a variety of healing foods that are fantastic for detoxing. Broccoli, zucchini, white onion, garlic, lemon, walnuts, basil, and vegetable broth come together for a rich and luscious soup that is deeply comforting and cleansing.

Broccoli

Broccoli is a superstar cruciferous vegetable that is packed with nutrients that enhance detoxification and healing. Broccoli has specific phytochemicals which support every phase of the detox process. Broccoli is rich in antioxidants including lutein, zeaxanthin, and beta-carotene that protect us from free radicals, toxins, and degenerative diseases like cancer. Broccoli also contains important flavonoids like kaempferol which fight chronic inflammation. Other important nutrients in broccoli include vitamin A, vitamin K, vitamin E, manganese, zinc, omega-3 fatty acids (ALA), sulforaphane, and fibre which all work together to detox, cleanse, and rebuild our body and keep it strong and healthy. If you really want to up the detox power of this soup, top with nutrient-dense broccoli sprouts which are even richer in sulforaphane than broccoli florets.

Garlic

Garlic is an amazing vegetable that is a member of the Allium family that includes onions, shallots, and leeks. Garlic is a must have in many of my recipes because I love its pungent flavour and fabulous health benefits. Crushing, mincing, or grating garlic before eating it activates many of its key phytochemicals. Garlic’s high amount of sulfur and the compound allicin are two of the reasons why garlic has so many important health benefits. Garlic is a natural antibiotic, with anti-inflammatory, anti-fungal, and anti-viral properties that make it a strong immune system booster.

Zucchini

Zucchini is a squash with a mild flavour that blends well with other vegetables. Zucchini contains good amounts of carotenoids including alpha-carotene, beta-carotene, lutein and zeaxanthin which offers excellent protection against oxidative stress caused by environmental toxins. Zucchini also contains high amounts of vitamin A, B vitamins, vitamin C, zinc, magnesium and fibre. To get the full benefits of the antioxidants contained in zucchini squash, buy organic so you can eat the skin, seeds, and flesh.

Basil

Basil is one of my absolute favourite herbs to use in recipes! It has a wonderful herbaceous flavour that adds delicious flavour to any recipe you add it to. Basil has many health benefits including being a fantastic anti-inflammatory and anti-bacterial food due to the presence of flavonoids especially estragole and eugenol.
Basil contains high amounts of beta-carotene, pro-vitamin A, iron, vitamin C, vitamin K, calcium, potassium, and magnesium which are key nutrients for maintaining vibrant health.

What’s your favourite soup blend? Please contribute to the conversation by leaving a comment below.
If you enjoyed this post, please check out my new cookbook that’s packed with 154 tasty healing foods recipes and over 50 pages of holistic lifestyle tips for more energy and better immunity! Deliciously Holistic is for sale on Amazon right now!
By Shelley Alexander


Broccoli Basil Cream Soup

Vegan, Paleo, Vegetarian, Dairy-Free, Gluten-Free, Sugar-Free

Makes 2-4 servings
2 tablespoons extra virgin olive oil or virgin coconut oil
½ cup diced white onion
1 cup diced organic zucchini squash (leave skin on)
Unrefined sea salt-to taste
4 cups steamed organic broccoli florets
4 cups organic vegetable broth or stock
2 cloves grated garlic
Fresh ground black pepper-to taste
⅓ cup raw walnuts (soak for 3 hours in filtered water, rinsed well, and drained)
1 tablespoon fresh lemon juice
6-8 fresh basil leaves
½ cup broccoli sprouts-optional but are potent detoxifiers


1. Place olive oil or coconut oil in a medium-size pot with a lid and heat over medium heat until hot but not smoking. Add diced onions and cubed zucchini and sprinkle with sea salt to taste. Cook zucchini and onions until tender, around 7-8 minutes.

2. Placed cooked vegetables into a high speed blender with steamed broccoli, ½ cup vegetable broth, grated garlic, black pepper to taste, and drained walnuts. Blend on high until smooth and creamy.

3. Pour vegetable-walnut mixture into the pot you cooked the zucchini in and add remaining vegetable broth and sea salt to taste. Stir to blend together and cover pot with lid.

4. Cook Broccoli Basil Cream Soup over low heat until hot but not boiling. Taste and adjust seasoning if needed and pour into serving bowl. Sprinkle hot soup with fresh basil leaves, lemon juice, and broccoli sprouts if you decide to use them.

5. Place leftover soup into a heatproof container with a lid and cool slightly before placing in the refrigerator. Reheat remaining soup over low heat for dinner meal.
http://aharmonyhealing.com/broccoli-basil-cream-soup/

Thursday, 9 April 2015

Vegetarian Recipe: Perfect Falafel

One middle-eastern cuisine many of us have probably encountered along the line is falafel. They're deep-fried patties of ground chickpeas or fava beans, and they make a perfect little appetizer, or even a main ingredient in a homemade gyro. The mood struck recently, and we couldn't help making our own.
For our recipe, we used a mixture of chickpeas and fava beans to get the perfect texture and base flavor. We then seasoned them with coriander, cumin, cayenne, and a few additional herbs. We didn't want to use up too much oil in deep-frying, so instead we relied on pan-frying our fritters to get the perfect crunch without them becoming too greasy. Keep reading below for our favorite recipe...
falafel recipe

Falafel

(makes 12 pitas)
Ingredients
  • 1 cup dried chickpeas
  • 3/4 cup dried split fava beans
  • 3 cloves garlic, minced
  • 1 small red onion, quartered
  • 1 teaspoon ground coriander
  • 1 tablespoon ground cumin
  • 1 teaspoon cayenne
  • 1/2 cup chopped fresh cilantro
  • 1 teaspoon salt
  • 1/2 teaspoon black pepper
  • 1/2 teaspoon baking soda
  • 1 tablespoon lemon juice or more to taste
  • grapeseed oil for frying
Directions
  1. Put the beans in a large bowl and cover with water by 4". Soak for 24 hours, checking occasionally to make sure you don't need to add more water to keep the beans covered.
  2. Drain the beans and transfer to a food processor with all of the remaining ingredients except the oil. Pulse until minced but not pureed. Add water tablespoon by tablespoon if necessary to make sure the machine is able to work. You want to mixture is as dry as possible, though. Taste the mixture and adjust the seasoning to taste. Refrigerate for at least 20 minutes.
  3. Form the mixture into balls a little smaller than golf balls and flatten just a little. In a nonstick pan, heat 1/4" grapeseed oil on medium high heat until it sizzles when  a small piece of falafel is added. Turn the heat to medium.
  4. Add just one falafel to begin with and fry until all sides are a deep golden-brown (about 6 to 7 minutes). If it browns too quickly, turn the heat down a little.  If the falafel sticks to the pan, dredge the falafel in a little flour. From there, cook the remaining falafel in the oil. Serve with pita bread and tahini sauce.
  5. Enjoy!

Tuesday, 17 March 2015

Raw Chocolate Chia Energy Bars (Recipe)

Raw Chocolate Chia Energy Bars (Recipe)
The humble ancient chia seed is a powerhouse of nutrition all packed into one tiny little shell. If you are looking to boost your nutritional intake, then these are one amazing superfood to add to your diet. Not only are they a wonderful source of protein to help build beautiful hair, skin, nails and vitally important muscles and red blood cells; they also have a large range of essential and non essential amino acids and fiber that help promote healthy heart and circulation.

Raw Chocolate Chia Energy Bars (Recipe)


Whole chia seeds add nutritional punch and crunch to these chocolate treats. Makes 8 bars

Ingredients:


  • 1 ½ cups pitted dates
  •  cup raw unsweetened cocoa powder
  •  cup whole chia seeds
  • ½ tsp. vanilla extract, optional
  • ¼ tsp. almond extract, optional
  • 1 cup raw slivered almonds or raw shelled pistachios
  • Oat flour for dusting, optional

Method: 


1. Place dates in bowl of food processor; purée until thick paste forms. Add cocoa powder, chia seeds, and vanilla and almond extracts, if using. Pulse until all ingredients are combined. Add almonds; pulse until nuts are finely chopped and well distributed through date mixture.

2. Spread large sheet of wax paper on work surface, and dust with oat flour, if using. Transfer date mixture to wax paper, and use paper to press mixture into ½-inch-thick rectangle. Wrap tightly, and chill overnight.

3. Unwrap block, and cut into 8 bars. Dust edges and sides with oat flour, if using, to prevent sticking. Rewrap each bar in wax paper.
http://www.foodmatters.tv/articles-1/raw-chocolate-chia-energy-bars

Monday, 9 March 2015

COCONUT LEMON MOUSSE (PALEO, RAW & VEGAN)

Coconut Lemon Mousse (Paleo, Raw, Vegan)
While it’s already known that coconut milk can do no wrong, as demonstrated by this tomato curry with creamy coconut cauliflower rice, we can never get enough of this magic the liquid that comes from the grated meat of a coconut.
And then there’s coconut cream, which is the thick non-liquid part that separates and rises to the top of the coconut milk when is refrigerated and allowed to set.
Coconut cream is very similar to coconut milk but is thicker because - of course - it contains less water.
Now here’s the thing about coconut cream, you can make luscious whipped cream from it.
I know, BOOM!
Coconut Lemon Mousse (Paleo, Raw, Vegan)

Coconut cream whips up into thick yet airy whipped cream, a bazillion times better than Cool Whip.
But then again Cool Whip is gross; almost anything is better than Cool Whip.
Still a fan of Cool Whip? Think again!
Blogger Jonathan Fields did a little experiment to teach his daughter a lesson on why not to eat Cool Whip. Read up on his horrifying 12-day Cool Whip.
I know, ewww...
Coconut Lemon Mousse (Paleo, Raw, Vegan)

Back to whipped coconut cream; whenever you want something creamy and non-dairy to go with your dessert, it’s a fantastic option.
It does taste strongly of coconut, however, as you might expect.
So if you do not like the flavor of coconut, this is not for you.
But for all you coconut lovers out there, I bring you this I-cannot-find-the-proper-words-to-define-it Coconut Lemon Mousse.
The recipe features whipped coconut cream, lemon zest, vanilla and a sweetener of your choice.
I’ll let you contemplate that for a moment. Take your time.

Coconut Lemon Mousse                                                                                        Print this recipe! 
Inspired by GI365

For the coconut cream, refrigerate the cans of coconut milk overnight, (several days if possible) then scoop out the cream that rises to the top and reserve the liquid for other uses.

Ingredients 
Serves 4

Ingredients

Coconut cream scraped from the top of 2 (13.5 oz) chilled cans of full fat coconut milk (use BPA-free coconut milk)
2 tablespoons raw coconut palm sugar (or other sweetener of your choice)
½ teaspoon vanilla extract
zest of one lemon
pinch of salt

Directions

In a small bowl combine coconut sugar with the lemon zest, rubbing the mixture between your fingers to help infuse the sugar with the lemon flavor.
In a large bowl of a heavy-duty mixer or with an electric hand mixer, fitted with whisk attachment, beat/whip coconut cream and salt, starting on low, increasing incrementally to medium speed until soft peaks become visible, about 2 minutes.
Add the sugar mixture and vanilla extract and beat until the mixture is smooth and the sugar is no longer visible.
Divide the mixture evenly among ramekins and refrigerate until ready to serve.

Nutrition facts

One serving yields 316 calories, 30 grams of fat, 9 grams of carbs and 3 grams of protein.

Sunday, 1 March 2015

Raw Moringa Kiwi Vegan Cheesecake

Raw Moringa KIwi Cheese Cake

Raw Moringa KIwi Cheese Cake
Raw Moringa Kiwi Cheese Cake

Raw Moringa Kiwi Cheesecake

Raw Moringa Kiwi Vegan Cheesecake Featured
  • YIELD: 8' spring form mould (12 Servings)
  • PREP: 50 mins
Is the first time try to use fresh Moringa leave to make a raw cheese cake ,the natural green cheesecake taste was just fantastic. !! Moringa contain a large amount of natural chlorophyll. Check out more about the goodness of Morniga ♥

Ingredients

Instructions

  1. Dehydrated grated coconuts or you can dry fry in non stick pan until turn brown & fragrant.
  2. Dehydrator almonds and walnuts . If you don’t have a dehydrator it can be done using the warm setting on your oven, though highly energy inefficient until crunchy.
  3. Place the dates and almonds ,walnuts, flax seeds in the food processor and process until it as format into chunks, dates are well incorporated and the mixture begins to clump together, avoid this over process !
  4. After processed mixed the toasted grated coconuts, so it’s even sticks all together in the bottom of the cake mold and press until gets firm , set aside or refrigerated.
  5. For Raw Moringa kiwi cheese cream. Place all cream ingredient in vita-mix container blend until a thick nice smooth creamy texture.
  6. Coconut water is needed to give the consistency of this cheese cream.
  7. Pour the cream on top of the almonds crust . moringa 2
  8. Keep in the freezer for few hours until it’s set or keep over night.Raw Moringa Kiwi Cheese Cake
  9. You need a bit of time for making this cheese cake , take it out of the freezer. Leave the cheese cake down the refrigerator for few hour before serving.Raw Moringa Kiwi Cheese Cake
  10. Garnish with some fresh grated coconut or dehydrated grated coconuts on top, Serve cold. ENJOY The Miracle Raw Moringa Kiwi cheese cake ♥ 
http://veganlogy.com/2013/11/22/raw-moringa-kiwi-cheesecake/

Monday, 16 February 2015

Blueberry Bliss Bars (No Baking and Only 4 Ingredients!)


I don’t know if you noticed, but I love recipes that use only a few ingredients.  These Blueberry Bliss Bars are just that.  All you need is 4 simple ingredients to make these blueberry bliss bars!  This no bake recipe is perfect for summer.  I know I don’t want to spend time in my kitchen with the oven on.  It’s hot down here in Dallas!
These blueberry bliss bars are vegan, gluten free and paleo.  This was my first time using coconut cream and I have to say that it was pretty much exactly like coconut butter.  The only difference I noticed, was that coconut cream seemed to soften faster out of the fridge.  Another great thing you could do with these no bake bars is drizzle a little of my 3 ingredient chocolate over the top.  Yum!  If you do that, then you will need to keep the bars in the freezer.

Recipe

Prep Time: 5 minutesTotal
Time: 5 minutes
Yield: 18 small squares

Ingredients

  • 2 cups creamed coconut (you can probably also use coconut butter)
  • 2 cups fresh organic blueberries (frozen, thawed might work too)
  • 1/4 cup pure maple syrup
  • 2 tsp ground vanilla beans
Blueberry-Bliss-Bars-Steps-ingredients-1

Instructions

  • Combine all ingredients in a food processor until the mixture is smooth.
  • Line an 8x8 pan with parchment paper, leaving enough room for some paper to stick out the sides.
  • Dump the mixture into the pan and spread it out evenly. The mixture is very thick and you may need to wet a spatula to help spread it evenly.
  • Once the mixture is in the pan. Gently press down using the extra sides of parchment paper.
  • Stick the pan in the fridge to firm up. This should only take about 15-20 minutes.
  • Once the mixture is firm, lift the whole thing out by the edges of parchment paper.
  • I used a pizza cutter to cut mine into squares.
Please store these bars in the fridge. I keep mine in an airtight container with a piece of parchment between each bar. They should last at least a week in the fridge and you can also freeze them for longer storage. Enjoy!

Tuesday, 3 February 2015

Avocado Pasta


Avocado Pasta - The easiest, most unbelievably creamy avocado pasta. And it'll be on your dinner table in just 20 min!

 
The easiest, most unbelievably creamy avocado pasta that everyone will love. And it’ll be on your dinner table in just 20 min!
 
Avocados. I love them. I could eat them by itself with a little bit of sea salt. I could eat them mashed up in guacamole with an entire bag of chips.

Avocado Pasta - The easiest, most unbelievably creamy avocado pasta. And it'll be on your dinner table in just 20 min!
And now, I can eat them in the most glorious, most creamy pasta I’ve ever had. And the best part about this is that there’s no cream or butter in this. All you need is simple, fresh ingredients. That’s it.

Avocado Pasta - The easiest, most unbelievably creamy avocado pasta. And it'll be on your dinner table in just 20 min!
So how is this so creamy? Well, all you need are a couple of ripe avocados, fresh basil leaves, garlic, lemon juice and olive oil. From there, you can just throw it all into a food processor and give it a whirl! Done and done.
Avocado Pasta - The easiest, most unbelievably creamy avocado pasta. And it'll be on your dinner table in just 20 min!
Toss it with your favorite pasta noodles – spaghetti, rotini, macaroni, etc. – along with some fresh veggies. You can really use any veggies you’d like but I loved the sweet corn kernels and crisp cherry tomatoes.
Avocado Pasta - The easiest, most unbelievably creamy avocado pasta. And it'll be on your dinner table in just 20 min!
Plus, it’ll be on your dinner table in 20 min from start to finish. It doesn’t get much easier than that!
Avocado Pasta
Prep Time 10 minutes
Cook Time 10 minutes
Total Time 20 minutes
Yield 4 servings
Avocado Pasta
The easiest, most unbelievably creamy avocado pasta that everyone will love. And it'll be on your dinner table in just 20 min!
Ingredients
  • 12 ounces spaghetti
  • 2 ripe avocados, halved, seeded and peeled
  • 1/2 cup fresh basil leaves
  • 2 cloves garlic
  • 2 tablespoons freshly squeezed lemon juice
  • Kosher salt and freshly ground black pepper, to taste
  • 1/3 cup olive oil
  • 1 cup cherry tomatoes, halved
  • 1/2 cup canned corn kernels, drained and rinsed
Instructions
  • In a large pot of boiling salted water, cook pasta according to package instructions; drain well.
  • To make the avocado sauce, combine avocados, basil, garlic and lemon juice in the bowl of a food processor; season with salt and pepper, to taste. With the motor running, add olive oil in a slow stream until emulsified; set aside.
  • In a large bowl, combine pasta, avocado sauce, cherry tomatoes and corn.
  • Serve immediately.
Notes 

Why It’s A Smart Choice

Nutrition Facts
Serving Size
Servings Per Container 4

Amount Per Serving
Calories 670.7 Calories from Fat 307.8
% Daily Value*
Total Fat 34.2g 53%
Saturated Fat 4.9g 25%
Trans Fat 0g
Cholesterol 0mg 0%
Sodium 106.2mg 4%
Total Carbohydrate 80.7g 27%
Dietary Fiber 10.5g 42%
Sugars 5.2g
Protein 14.3g 29%

*Percent Daily Values are based on a 2,000 calorie diet. Your daily values may be higher or lower depending on your calorie needs.

Using avocados instead of cream is a great way to get rid of saturated fats in favor of mono-unsaturated fats, which can have a positive effect on blood cholesterol. Additionally, this is a great recipe to serve to guests or take to a potluck since it fits into so many different diet needs: vegan, milk-free, or egg-free!
Nutritional information provided by Jessica Penner, RD at Smart Nutrition.